
xen-create-image میباشد که تقریبا این فرآیند را خودکارسازی میکند. تنها پارامتر ضروری آن --hostname است که نام domU را مشخص میکند؛ سایر گزینهها نیز مهم هستند ولی میتوانند درون فایل پیکربندی /etc/xen-tools/xen-tools.conf قرار بگیرند که نبود آنها خطایی را در هنگام اجرای دستور صادر نمیکند. بنابراین مهم است که محتوای این فایل را قبل از ایجاد هر image بررسی کرده یا از پارامترهای اضافی هنگام فراخوانی xen-create-image استفاده کنیم. پارامترهای مهم قابل ذکر عبارتند از:
--memory، برای مشخص کردن میزان RAM اختصاص یافته به سیستم جدید؛
--size و --swap، برای تعریف اندازه "دیسکهای مجازی" موجود برای domU؛
--debootstrap-cmd, to specify the which debootstrap command is used. The default is debootstrap if debootstrap and cdebootstrap are installed. In that case, the --dist option will also most often be used (with a distribution name such as bookworm).
--dhcp بیان میکند که پیکربندی شبکه domU باید از طریق DHCP انجام شود در صورتی که --ip امکان استفاده از نشانی ایستای IP را فراهم میکند.
--dir، ایجاد یک فایل در dom0 به ازای هر دستگاه domU فراهمکننده آن است. برای سیستمهایی که از LVM استفاده میکنند، گزینه جایگزین استفاده از --lvm است، که همراه با نام یک گروه آرایه آورده میشود؛ سپس xen-create-image اقدام به ایجاد یک گروه منطقی درون آرایهها میکند که این گروه منطقی به عنوان یک درایو هارد دیسک به domU معرفی میگردد.
#xen-create-image --hostname testxen --dhcp --dir /srv/testxen --size=4G --dist=bookworm --role=udevGeneral Information -------------------- Hostname : testxen Distribution : bookworm Mirror : http://deb.debian.org/debian Partitions : swap 512M (swap) / 4G (ext4) Image type : sparse Memory size : 256M Bootloader : pygrub Networking Information ---------------------- IP Address : DHCP [MAC: 00:16:3E:9F:55:BB] Creating partition image: /srv/testxen/domains/testxen/swap.img Done Creating swap on /srv/testxen/domains/testxen/swap.img Done Creating partition image: /srv/testxen/domains/testxen/disk.img Done Creating ext4 filesystem on /srv/testxen/domains/testxen/disk.img Done Installation method: debootstrap Done Running hooks Done Role: udev File: /etc/xen-tools/role.d/udev Role script completed. Creating Xen configuration file Done No role scripts were specified. Skipping Setting up root password Generating a password for the new guest. All done Logfile produced at: /var/log/xen-tools/testxen.log Installation Summary --------------------- Hostname : testxen Distribution : bookworm MAC Address : 00:16:3E:9F:55:BB IP Address(es) : dynamic SSH Fingerprint : SHA256:JsTNzWbiRoqTwZ60GAFFpl+s+/rmWf5GhQexQz1gCm8 (DSA) SSH Fingerprint : SHA256:iEuV3oFhRdDRoytTpxF4YMMgewTsQKYTU709kxCH+tk (ECDSA) SSH Fingerprint : SHA256:LSrc0bAIaeKI0neSEeT+Oun6uBbu47sKAo2agmq+jCI (ED25519) SSH Fingerprint : SHA256:/4OS5h74tkzSlk5/EU/tchvrar32vpoJoCudyDnw9W0 (RSA) Root Password : 3Bbnf5qFcEMDucK4sMYFJY7
vif*، veth*، peth* و xenbr0. hypervisor موجود در Xen با توجه به لایه تعریف شده آنها را مرتبسازی میکند که این کار با استفاده از ابزارهای سمت-کاربر صورت میگیرد. از آنجا که مدلهای NAT و routing تنها برای موارد خاص کاربرد دارند، تنها به بررسی مدل bridge میپردازیم.
xend daemon is configured to integrate virtual network interfaces into any pre-existing network bridge (with xenbr0 taking precedence if several such bridges exist). We must therefore set up a bridge in /etc/network/interfaces (which requires installing the bridge-utils package, which is why the xen-utils package recommends it) to replace the existing eth0 entry. Be careful to use the correct network device name:
auto xenbr0
iface xenbr0 inet dhcp
    bridge_ports eth0
    bridge_maxwait 0
xl command. This command allows different manipulations on the domains, including listing them and, starting/stopping them. You might need to increase the default memory by editing the variable memory from configuration file (in this case, /etc/xen/testxen.cfg). Here we have set it to 1024 (megabytes).
#xl listName ID Mem VCPUs State Time(s) Domain-0 0 7973 4 r----- 13.6 #xl create /etc/xen/testxen.cfgParsing config from /etc/xen/testxen.cfg #xl listName ID Mem VCPUs State Time(s) Domain-0 0 7841 4 r----- 87.1 testxen 4 0 0 --p--- 0.0
hvc0 همراه با دستور xl console است:
#xl console testxen[...] Debian GNU/Linux 12 testxen hvc0 testxen login:
xl pause و xl unpause میتواند به صورت موقت متوقف شده یا ادامه یابد. به یاد داشته باشید که یک domU متوقف شده با اینکه از قدرت پردازنده استفاده نمیکند، اما هم اکنون حافظه اختصاص یافته به خود را دارد. استفاده از دستورات xl save و xl restore نیز قابل توجه است: ذخیرهسازی یک domU تمام منابع اختصاص یافته به آن، از جمله RAM، را آزادسازی میکند. در زمان بازگرداندن (یا ادامه، به این منظور) یک domU چیزی به جز گذشت زمان را احساس نمیکند. اگر هنگام خاموش کردن dom0 یک domU در حال اجرا باشد، اسکریپتهای پیکربندی به صورت خودکار domU را ذخیرهسازی کرده تا در راهاندازی بعدی از سر گرفته شود. این عمل البته ناملایمتهای عملیات hibernate کردن یک رایانه لپتاپ را به همراه دارد، برای نمونه؛ به طور مشخص اگر domU به مدت زمان طولانی در حالت تعلیق باشد، ارتباطات شبکه ممکن است منقضی گردند. به یاد داشته باشید که Xen به شدت ناسازگار با بخش مدیریت قدرت ACPI است، که عملیات متوقفسازی سیستم میزبان (dom0) را انجام میدهد.
shutdown) یا از طریق dom0 با استفاده از xl shutdown یا xl reboot انجام شود.
xl شامل یک یا چند آرگومان هستند، که بیشتر شامل نام یک domU میشود. این آرگومانها به خوبی در صفحه راهنمای xl(1) توضیح داده شدهاند.
init process, and the resulting set looks very much like a virtual machine. The official name for such a setup is a “container” (hence the LXC moniker: LinuX Containers), but a rather important difference with “real” virtual machines such as provided by Xen or KVM is that there is no second kernel; the container uses the very same kernel as the host system. This has both pros and cons: advantages include excellent performance due to the total lack of overhead, and the fact that the kernel has a global vision of all the processes running on the system, so the scheduling can be more efficient than it would be if two independent kernels were to schedule different task sets. Chief among the inconveniences is the impossibility to run a different kernel in a container (whether a different Linux version or a different operating system altogether).
/sys/fs/cgroup متصل میشود. از آنجا که دبیان ۸ به systemd روی آورده، که خود مبتنی بر گروههای کنترل است، اینکار در زمان راهاندازی سیستم بدون هیچ پیکربندی خاص صورت میگیرد.
/etc/network/interfaces, moving the configuration for the physical interface (for instance, eth0 or enp1s0) to a bridge interface (usually br0), and configuring the link between them. For instance, if the network interface configuration file initially contains entries such as the following:
auto eth0
iface eth0 inet dhcp
auto eth0
iface eth0 inet static

auto br0
iface br0 inet dhcp
bridge-ports eth0eth0 همراه با رابطهای تعریف شده برای مخازن میباشد.
/etc/network/interfaces سپس به صورت زیر در میآید:
# Interface eth0 is unchanged
auto eth0
iface eth0 inet dhcp

# Virtual interface
auto tap0
iface tap0 inet manual
    vde2-switch -t tap0

# Bridge for containers
auto br0
iface br0 inet static
    bridge-ports tap0
    address 10.0.0.1
    netmask 255.255.255.0
br0 پاسخ دهد.
#lxc-create -n testlxc -t debiandebootstrap is /usr/sbin/debootstrap Checking cache download in /var/cache/lxc/debian/rootfs-stable-amd64 ... Downloading debian minimal ... I: Retrieving Release I: Retrieving Release.gpg [...] Download complete. Copying rootfs to /var/lib/lxc/testlxc/rootfs... [...] #
/var/cache/lxc ایجاد شد، سپس به مقصد خود انتقال یافت. اینکار امکان ایجاد مخازن مشابه را با سرعت بیشتری فراهم میکند، چرا که تنها عملیات رونوشتگیری مورد نیاز است.
--arch option to specify the architecture of the system to be installed and a --release option if you want to install something else than the current stable release of Debian. You can also set the MIRROR environment variable to point to a local Debian mirror.
lxcbr0, which by default is used by all newly created containers via /etc/lxc/default.conf and the lxc-net service:
lxc.net.0.type = veth
lxc.net.0.link = lxcbr0
lxc.net.0.flags = up
lxcbr0 bridge on the host. You will find these settings in the created container's configuration (/var/lib/lxc/testlxc/config), where also the device' MAC address will be specified in lxc.net.0.hwaddr. Should this last entry be missing or disabled, a random MAC address will be generated.
lxc.uts.name = testlxc
lxc-start --name=testlxc.
lxc-attach -n testlxc passwd if we want. We can login with:
#lxc-console -n testlxcConnected to tty 1 Type <Ctrl+a q> to exit the console, <Ctrl+a Ctrl+a> to enter Ctrl+a itself Debian GNU/Linux 12 testlxc tty1 testlxc login:rootPassword: Linux testlxc 6.1.0-23-amd64 #1 SMP Debian 6.1.99-1 (2024-07-15) x86_64 The programs included with the Debian GNU/Linux system are free software; the exact distribution terms for each program are described in the individual files in /usr/share/doc/*/copyright. Debian GNU/Linux comes with ABSOLUTELY NO WARRANTY, to the extent permitted by applicable law. Last login: Wed Jun 7 18:39:37 UTC 2024 on console root@testlxc:~#ps auxwfUSER PID %CPU %MEM VSZ RSS TTY STAT START TIME COMMAND root 1 0.0 0.2 18964 11464 ? Ss 01:36 0:00 /sbin/init root 45 0.0 0.2 31940 10396 ? Ss 01:37 0:00 /lib/systemd/systemd-journald root 71 0.0 0.1 99800 5724 ? Ssl 01:37 0:00 /sbin/dhclient -4 -v -i -pf /run/dhclient.eth0.pid [..] root 97 0.0 0.1 13276 6980 ? Ss 01:37 0:00 sshd: /usr/sbin/sshd -D [listener] 0 of 10-100 startups root 160 0.0 0.0 6276 3928 pts/0 Ss 01:46 0:00 /bin/login -p -- root 169 0.0 0.0 7100 3824 pts/0 S 01:51 0:00 \_ -bash root 172 0.0 0.0 9672 3348 pts/0 R+ 01:51 0:00 \_ ps auxwf root 164 0.0 0.0 5416 2128 pts/1 Ss+ 01:49 0:00 /sbin/agetty -o -p -- \u --noclear [...] root@testlxc:~#
/var/lib/lxc/testlxc/rootfs را شامل میشود. با استفاده از کلید ترکیبی Control+a q میتوانیم از کنسول خارج شویم.
lxc-start starting using the --daemon option by default. We can interrupt the container with a command such as lxc-stop --name=testlxc.
lxc-autostart است که به صورت خودکار مخازن شامل گزینه lxc.start.auto برابر ۱ را راهاندازی میکند). با استفاده از lxc.start.order و lxc.group میتوان کنترل بیشتری روی ترتیب اجرای مخازن اعمال کرد: به صورت پیشفرض، اسکریپت راهاندازی ابتدا مخازنی را آغاز میکند که جزو گروه onboot باشند سپس به سراغ مخازن دیگر میرود). در هر دو مورد، ترتیب درون هر گروه توسط گزینه lxc.start.order مشخص میشود.
qemu-* را مشاهده کنید: تمام آنها مرتبط با KVM هستند.
/proc/cpuinfo بگردید.
virt-manager is a graphical interface that uses libvirt to create and manage virtual machines.
apt-get install libvirt-clients libvirt-daemon-system qemu-kvm virtinst virt-manager virt-viewer. libvirt-daemon-system provides the libvirtd daemon, which allows (potentially remote) management of the virtual machines running of the host, and starts the required VMs when the host boots. libvirt-clients provides the virsh command-line tool, which allows controlling the libvirtd-managed machines.
virt-install میشود که امکان ایجاد ماشینهای مجازی از خط فرمان را فراهم میکند. در نهایت، virt-viewer اجازه دسترسی به کنسول گرافیکی یک ماشین مجازی را بوجود میآورد.
eth0 و bridge br0 است ادامه مییابد، به طوری که اولی به دومی متصل شده است.
libvirtd where to store the disk images, unless the default location (/var/lib/libvirt/images/) is fine.
#mkdir /srv/kvm#virsh pool-create-as srv-kvm dir --target /srv/kvmPool srv-kvm created #
virt-install بیندازیم. این دستور، ماشین مجازی و پارامترهای آن را در libvirtd ثبت میکند سپس به اجرای آن پرداخته تا فرآیند نصب ادامه یابد.
#virt-install --connect qemu:///system--virt-type kvm
--name testkvm
--memory 2048
--disk /srv/kvm/testkvm.qcow,format=qcow2,size=10
--cdrom /srv/isos/debian-12.6.0-amd64-netinst.iso
--network bridge=virbr0
--graphics vnc
--os-type linux
--os-variant debiantesting
Starting install... Allocating 'testkvm.qcow'
|
گزینه --connect مشخص میکند از کدام “hypervisor” استفاده شود. فرم استفاده از آن شامل یک URL همراه با سیستم مجازیسازی مرتبط (xen://، qemu://، lxc://، openvz://، vbox://) و ماشینی که باید از آن میزبانی کند میباشد (در صورت استفاده از localhost میتواند خالی باشد). علاوه بر این و در مورد QEMU/KVM، هر کاربر میتواند با استفاده از مجوزهای محدودشده ماشینهای مجازی را مدیریت کند و مسیر URL امکان تفاوت قائل شدن بین ماشینهای “سیستم” (/system) را از دیگر (/session) فراهم میکند.
|
|
از آنجا که KVM به شیوه مشابه QEMU مدیریت میشود، --virt-type kvm امکان مشخص کردن استفاده از KVM با وجود تشابه با URL QEMU را فراهم میکند.
|
|
گزینه --name یک نام (منحصربفرد) برای ماشین مجازی تعریف میکند.
|
|
The --memory option allows specifying the amount of RAM (in MB) to allocate for the virtual machine.
|
|
The --disk specifies the location of the image file that is to represent our virtual machine's hard disk; that file is created, unless present, with a size (in GB) specified by the size parameter. The format parameter allows choosing among several ways of storing the image file. The default format (qcow2) allows starting with a small file that only grows when the virtual machine starts actually using space.
|
|
گزینه --cdrom به منظور یافتن دیسک نوری برای فرآیند نصب استفاده میشود. مسیر میتواند شامل یک مسیر محلی برای فایل ISO، یک URL که فایل میتواند از آنجا دریافت شود یا فایل دستگاه مربوط به یک درایو فیزیکی CD-ROM باشد (/dev/cdrom).
|
|
گزینه --network مشخص میکند کارت مجازی شبکه چطور با پیکربندی سیستم میزبان ادغام شود. عملکرد پیشفرض آن (که در این نمونه به صورت صریح بیان کردهایم) ادغام آن با شبکه bridge از قبل موجود در سیستم است. اگر چنین bridge موجود نباشد، ماشین مجازی تنها با استفاده از NAT میتواند به شبکه فیزیکی دسترسی یابد، بنابراین یک نشانی در محدوده زیرشبکه 192.168.122.0/24 دریافت میکند.
The default network configuration, which contains the definition for a virbr0 bridge interface, can be edited using virsh net-edit default and started via virsh net-start default if not already done automatically during system start.
|
| --graphics vnc states that the graphical console should be made available using VNC. The default behavior for the associated VNC server is to only listen on the local interface; if the VNC client is to be run on a different host, establishing the connection will require setting up an SSH tunnel (see
قسمت 9.2.1.5, “ایجاد تونلهای رمزگذاری شده با پورت فورواردینگ”
). Alternatively, --graphics vnc,listen=0.0.0.0 can be used so that the VNC server is accessible from all interfaces; note that if you do that, you really should design your firewall accordingly.
|
|
گزینههای --os-type و --os-variant، با توجه به برخی از ویژگهای سیستم عامل اشاره شده، امکان بهینهسازی چندین پارامتر ماشین مجازی را فراهم میکنند.
The full list of OS types can be shown using the osinfo-query os command from the libosinfo-bin package.
|
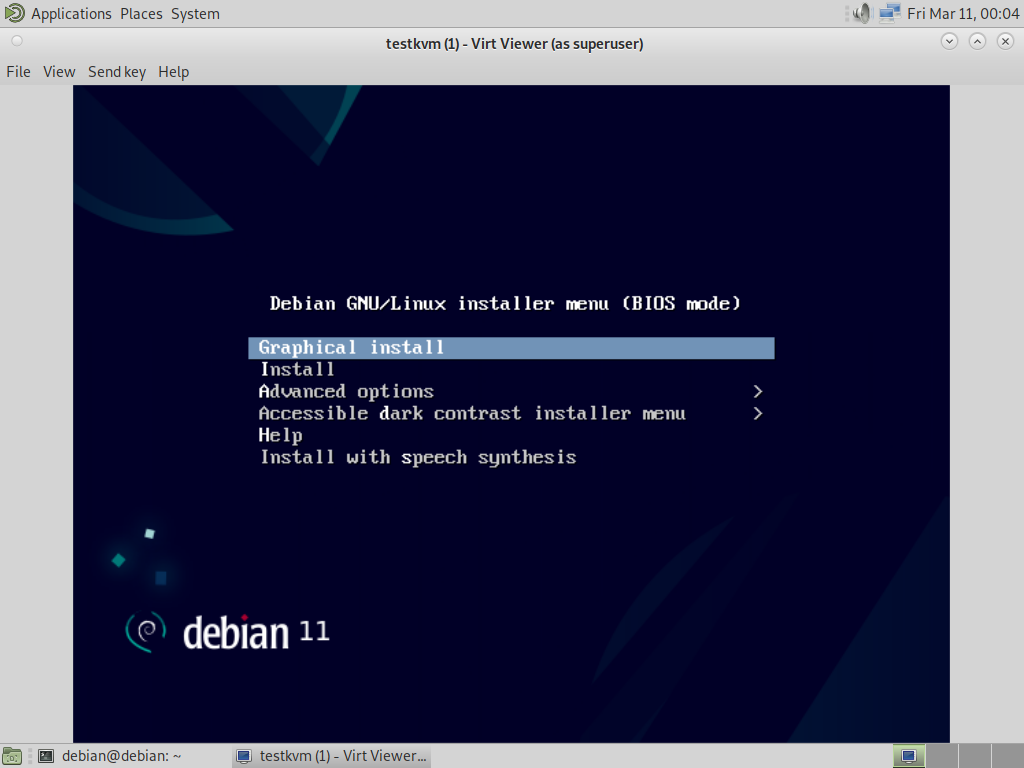
virt-viewer با استفاده از هر محیط گرافیکی برای باز کردن کنسول گرافیکی میتواند اجرا شود (به یاد داشته باشید که دو مرتبه گذرواژه root درخواست میشود چرا که ۲ ارتباط SSH مورد نیاز است):
$virt-viewer --connect qemu+ssh://root@server/system testkvmroot@server's password: root@server's password:
libvirtd برای فهرستی از ماشینهای مجازی موجود است:
#virsh -c qemu:///system list --all Id Name State ---------------------------------- 8 testkvm shut off
#virsh -c qemu:///system start testkvmDomain testkvm started
vncviewer استفاده شود):
#virsh -c qemu:///system vncdisplay testkvm127.0.0.1:0
virsh عبارتند از:
reboot برای راهاندازی مجدد یک ماشین مجازی؛
shutdown برای درخواست یک shutdown تمیز؛
destroy برای توقف خشن آن؛
suspend برای توقف عادی آن؛
resume برای ادامه فعالیت آن؛
autostart برای فعال کردن (یا غیر فعال کردن با گزینه --disable) راهاندازی ماشین مجازی به صورت خودکار در زمان راهاندازی میزبان؛
undefine برای حذف تمام نشانههای ماشین مجازی از libvirtd.